필요한 CS지식 정리
in Others on Others
필요한 cs지식 정리
glob
많은 파일들을 다뤄야 하는 파이썬 프로그램을 작성할때, 특정한 패턴이나 확장자를 가진 파일들의 경로나 이름이 필요할 때가 있다. glob모듈이 glob함수는 사용자가 제시한 조건에 맞는 파일명을 리스트 형식으로 변환한다
사용법
# dir폴더의 모든 서브폴더 및 파일 목록
# dir : file1.txt, file2.txt, file101.txt, file102.txt, filea.txt, fileb.txt, file1.jpg, file2.jpg
# dir/subdir : subfile1.txt, subfile2.txt

import glob

# '*'는 임의 길이의 모든 문자열을 의미한다.
>>> output = glob.glob('dir/*.txt')
>>> print(output)
['dir\\file1.txt', 'dir\\file101.txt', 'dir\\file102.txt', 'dir\\file2.txt', 'dir\\filea.txt', 'dir\\fileb.txt']

# '?'는 한자리의 문자를 의미한다.
>>> output = glob.glob('dir/file?.*')
>>> print(output)
['dir\\file1.bmp', 'dir\\file1.txt', 'dir\\file2.bmp', 'dir\\file2.txt', 'dir\\filea.txt', 'dir\\fileb.txt']
shuffle
shuffle()을 사용하면 설정된 epoch마다 Dataset을 섞을 수 있다. 그리고 dataset의 shuffle은 overfitting을 피할 떄 매우 중요하다
Map
map을 사용하여 dataset의 각 멤버에 사용자 지정함수를 적용할 수 있다. 다음 예제에서는 각 원소에 2를 곱한다.
x = np.array([[1],[2],[3],[4]])
# make a dataset from a numpy array
dataset = tf.data.Dataset.from_tensor_slices(x)
dataset = dataset.map(lambda x: x*2)
iter = dataset.make_one_shot_iterator()
el = iter.get_next()
with tf.Session() as sess:
#     this will run forever
        for _ in range(len(x)):
            print(sess.run(el))
결과:
[2]
[4]
[6]
[8]
파이썬 class모듈에서의 self, init
ex)
class Student:
    name = ''

    korean = 0

    english = 0

    math = 0

    def __init__(self, name, kor, eng, math):

        self.name = name

        self.korean = kor

        self.english = eng

        self.math = math

    def say_hello(self):

        return '안녕하세요 {}님'.format(self.name)

    def average(self):

        return (self.korean + self.english + self.math) / 3
이름 국어 영어 수학이라는 4개의 변수를 담을 수 있는 클래스이다 __init__이라는 생성자가 있는데 이는 파이썬에서 클래스의 생성자를 만들때 동일한 규칙이다. __init__을 사용하면 클래스명을 쓰고 옆에 바로 인자들을 채워 넣음으로써 그값들을 지닌 객체를 만들어 낼 수 있는것이다.
파이썬에서는 클래스에서 사용하는 함수의 첫번쨰 인자를(parameter)를 self로 사용하는 것이 원칙이다
args
args는 정해지지 않은 수의 파라미터를 받고 kwargs는 정해지지 않은 수의 키워드 파라미터를 받는다.
es)
def myFunc(*args):
    for arg in args:
        print(arg)
myFunc(10, 20, 'a')
[결과]
> 10
> 20
> a
TFrecord
TFRecord는 tensorflow에서 지원하는 파일 형식이다. 공식 홈페이지에는 TFRecord에 대해서 The TFRecord file format is a simple record-oriented binary format that many TensorFlow applications use for training data.라고 표현하고 있다. 간단히 말해서 바이너리 형식으로 저장하기 위한 용도의 파일 형식이라는 의미이다. 즉, TFRecord는 데이터를 자체적인 바이너리 형식으로 저장하는 기능을 제공한다.
TFRecord 파일은 텐서플로우로 딥러닝 학습을 하는데 필요한 데이터들을 보관하기 위한 데이타 포맷이다. 흔히들 텐서플로우의 표준 데이터 파일 포맷이라고도 한다.
“TFRecord 파일 생성하기”
import tensorflow as tf


def bytes_feature(values):
  return tf.train.Feature(bytes_list=tf.train.BytesList(value=[values]))

def int64_feature(values):
  if not isinstance(values, (tuple, list)):
    values = [values]
  return tf.train.Feature(int64_list=tf.train.Int64List(value=values))

def read_imagebytes(imagefile):
    file = open(imagefile,'rb')
    bytes = file.read()
    return bytes

def main():
	image_data = read_imagebytes('/home/input_image.jpg')
	tf_example = tf.train.Example(features=tf.train.Features(feature={
		#feature 정보 입력
      'image/encoded': bytes_feature(image_data),
      'image/format': bytes_feature(b'jpg'),
      'image/class/label': int64_feature(1),
      'image/height': int64_feature(75),
      'image/width': int64_feature(75),
	}))

	writer = tf.python_io.TFRecordWriter('/home/output_filename.tfrecord')
	writer.write(tf_example.SerializeToString())


main()
위 코드에서 보면 아시겠지만 저장되는 내용은 높이(height),너비(weight), 인코딩 포맷(format), 이미지 바이너리(encoded), 라벨(class/label) 정보 등이 있다. 그 외에도 min/max등에 정보들을 추가로 저장할 수 있다.
이와 같은 정보들은 tf.train.Example 객체를 생성할 때 feature인자로 전달되게 되는데 feature인자는 딕셔너리 형태로 전달된다.
feature={
		# feature 정보 입력
      'image/encoded': bytes_feature(image_data),
      'image/format': bytes_feature(b'jpg'),
      'image/class/label': int64_feature(1),
      'image/height': int64_feature(75),
      'image/width': int64_feature(75),
	}
‘image/encoded’는 데이타의 name이며 실제 데이타는 텐서플로우 피쳐 타입으로 변환하여 저장한다. (tf.train.Feature(bytes_list=tf.train.BytesList(value=[values])))
이와 같이 생성된 tf.train.Example 객체를 tf.python_io.TFRecordWriter을 이용해서 tfrecord파일에 써주는 것이다.
writer = tf.python_io.TFRecordWriter('/home/hyosung/output_filename.tfrecord')
writer.write(tf_example.SerializeToString())
pathlib
pathlib 모듈의 기본아이디어는 경로를 단순한 문자열이 아니라 객체로 다루는 것이다 가령 파일의 존재성 여부를 판단하는 것은 아래와 같이 작성할 수 있다.
import os
from pathlib import Path

file_path = './path/to/file'

# 기존 (os.path)
if os.path.exists(file_path):
  # do something

# pathlib
p = Path(file_path)
if p.exists():
  # do something
또한 요런식으로도 사용가능하므로 보기에도 편하다
 import os
from pathlib import Path

dir_name = 'dir'
sub_dir_name = 'sub_dir_name'
file_name = 'file'

# 기존 (os.path)
file = os.path.join(dir_name, sub_dir_name, file_name)

# pathlib
dir = Path(dir_name)
file = dir / sub_dir_name / file_name
os.path.join을 사용하지 않아도 파일로 바로 연결가능
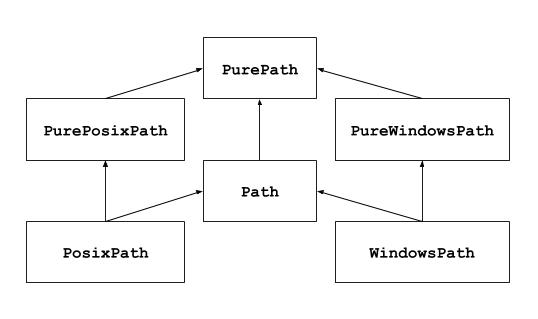
위그림은 path의 객체의 형태인데 이러한 상속구조를 가진다 purepath와 path의 차이점은 I/O와 관계된 메소드를 가지는 가에 대한 여부이다 일반적인 용도로 사용할 떄에는 그냥 path를 사용하면 되고 path오프젝트를 생성할 떄에 is에 맞춘 하위 클래스를 리턴해준다.
pathlib사용법
파일열기 -path.open
경로분석
from pathlib import Path

path = Path('/usr/bin/python3')

path
# PosixPath('/usr/bin/python3')

str(path)
# '/usr/bin/python3'

path.parts
# ('/', 'usr', 'bin', 'python3')

path.parent
# PosixPath('/usr/bin')

list(path.parents)
# [PosixPath('/usr/bin'), PosixPath('/usr'), PosixPath('/')]

# -----

path = Path('/usr/bin/python3/../')

# 주의!
path.parent
# PosixPath('/usr/bin/python3')

path.resolve()
# PosixPath('/usr/bin')
리스팅 glob패턴을 사용하여 파일/디렉토리를 리스팅할 수 있다.
from pathlib import Path

path = Path('.')

files = path.glob('*')
# <generator object Path.glob at 0x7f0ff370a360>

list(files)
# [PosixPath('.git'), PosixPath('.gitconfig'), PosixPath('.vimrc'), PosixPath('.zshrc'), PosixPath('pre-commit')]

# path.rglob(*)도 동일하다
list(path.glob('**/*'))
# [PosixPath('.git/COMMIT_EDITMSG'), PosixPath('.git/config'), PosixPath('.git/description'), PosixPath('.git/HEAD'), PosixPath('.git/hooks'), PosixPath('.git/index'), PosixPath('.git/info'), PosixPath('.git/logs'), PosixPath('.git/objects'), PosixPath('.git/refs')]

# path가 가리키는 폴더를 리스팅 할때는 glob('*') 대신 iterdir을 사용할 수 있다.
list(path.iterdir())
# [PosixPath('.git'), PosixPath('.gitconfig'), PosixPath('.vimrc'), PosixPath('.zshrc'), PosixPath('pre-commit')]